MRCP respiratory gated
Indications for magnetic resonance cholangiopancreatography
- Biliary obstruction (choledocholithiasis, benign and malignant strictures)
- Bile ducts, surgery or postsurgical biliary tract alterations
- Biliary cystadenoma and cystadenocarcinoma
- Congenital anomalies
- Pancreatic pseudocyst
- Chronic pancreatitis
- Acute cholecystitis
- Bile ducts, calculi
- Pancreatic cancer
- Pancreas divisum
Contraindications
- Any electrically, magnetically or mechanically activated implant (e.g. cardiac pacemaker, insulin pump biostimulator, neurostimulator, cochlear implant, and hearing aids)
- Intracranial aneurysm clips (unless made of titanium)
- Pregnancy (risk vs benefit ratio to be assessed)
- Ferromagnetic surgical clips or staples
- Metallic foreign body in the eye
- Metal shrapnel or bullet
Patient preparation
- A satisfactory written consent form must be taken from the patient before entering the scanner room
- Ask the patient to remove all metal objects including keys, coins, wallet, cards with magnetic strips, jewellery, hearing aid and hairpins
- Ask the patient to undress and change into a hospital gown
- Instruct the patient breathe gently for the respiratory gated scans.
- Instruct the patient breathe gently for the respiratory gated scans.
- Claustrophobic patients may be accompanied into the scanner room e.g. by staff member or relative with proper safety screening
- Patients should fast for 4 -6 hours before the exam (nothing to eat or drink)
- Offer headphones for communicating with the patient and ear protection
- Explain the procedure to the patient and answer questions
- Note down the hight and weight of the patient
Positioning
- Position the patient in supine position with head pointing towards the magnet (head first supine)
- Position the patient over the spine coil and place the body coil over the upper abdomen (nipple down to iliac crest)
- Securely tighten the body coil using straps to prevent respiratory artefacts
- Give a pillow under the head and cushions under the legs for extra comfort
- Centre the laser beam localizer over xiphoid process of sternum

Suggested protocols, parameters and planning
localiser free breathing
To localize and plan the sequences, it is essential to acquire a three-plane T2 HASTE localizer initially. These fast single-shot localizers have an acquisition time of under 25 seconds and are highly effective in accurately localizing abdominal structures.

T2 HASTE coronal 6mm respiratory gated
Plan the coronal slices on the axial localizer and position the block horizontally across the liver as depicted. Verify the position in the other two planes. Establish an appropriate angle in the sagittal plane, aligning it vertically across the liver. Ensure that the slices adequately cover the entire liver, extending from the anterior abdominal wall to the erector spinae muscles. The phase direction should be from right to left to minimize ghosting artifacts from the lungs and heart. Employ phase oversampling to prevent wrap-around artifacts. Instruct the patient to breathe gently throughout the scan.
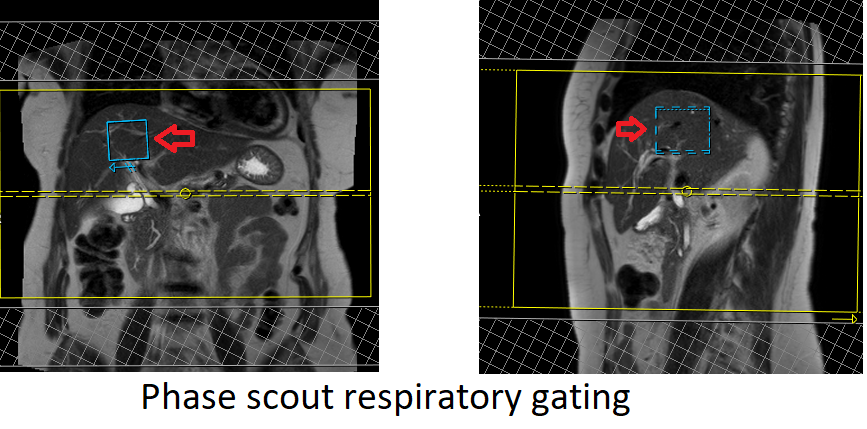
In modern scanners, respiratory gating is achieved using phase scout navigators placed inside the liver tissues. In older generation scanners, the liver dome respiratory trigger method can be utilized. However, in our department, we prefer using phase scout navigators. For respiratory gated scans utilizing phase scout navigators, it is essential to accurately position the respiratory navigator box within the liver. Ensure that no part of the navigation box extends beyond the liver boundaries. Planning should be conducted using a free breathing localizer, as the diaphragm’s downward movement during inhalation can result in improper slice planning and positioning of the respiratory navigator box.
Parameters
TR 2000-2500 | TE 90-110 | FLIP 130 | NEX 1 | SLICE 6MM | MATRIX 256×256 | FOV 350 | PHASE R>L | OVERSAMPLE 50% | TRIGGER NO |
Phase scout respiratory gating
Phase scout respiratory gating is a technique used to synchronize image acquisition with the patient’s respiratory motion. It involves acquiring a low-resolution, single-shot MR image during free breathing, referred to as a phase scout or navigator scan. This scout image is typically acquired in the liver region, as it exhibits prominent respiratory motion.
The acquired phase scout image is used to track the patient’s respiratory motion by monitoring changes in the position of anatomical structures, such as the diaphragm or liver dome, between successive acquisitions. The position information is then used to trigger the start of image acquisition at specific phases of the respiratory cycle, typically during end-expiration when motion artifacts are minimal.
By employing phase scout respiratory gating, scanner can acquire images at specific respiratory phases, resulting in reduced motion artifacts and improved image quality. This technique is particularly beneficial when imaging anatomical regions affected by respiratory motion, such as the liver, allowing for clearer and more accurate diagnostic images.
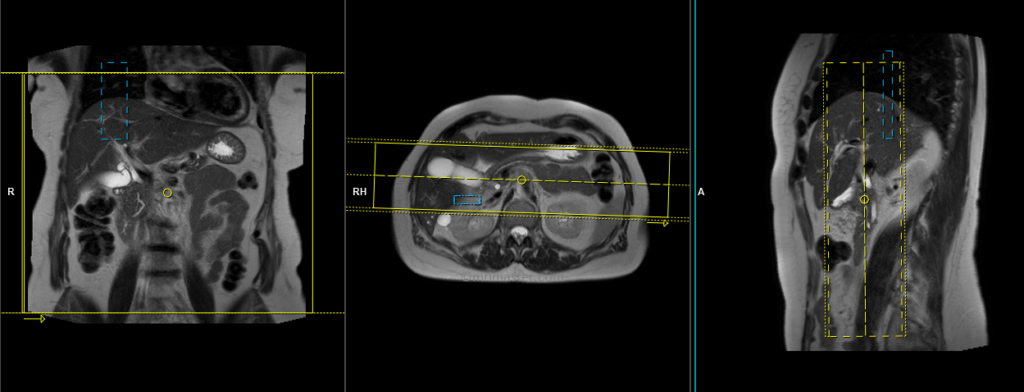
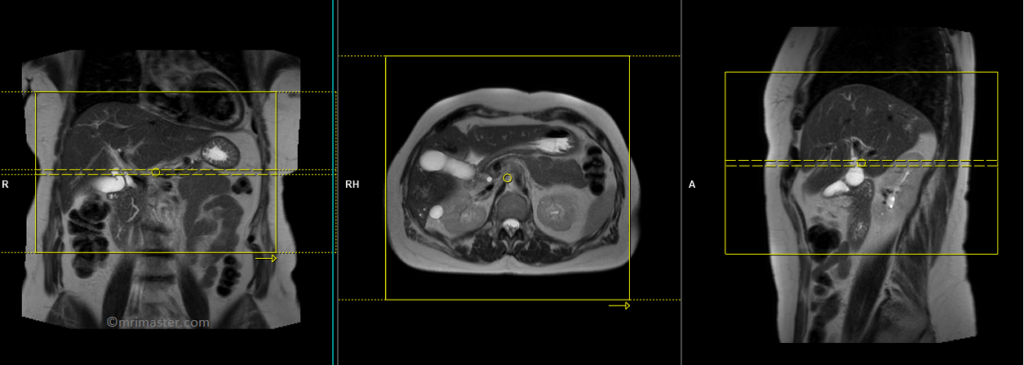
T2 HASTE axial fat saturated 6mm respiratory gated
Plan the axial slices on the coronal breath hold images and position the block horizontally across the liver as shown. Verify the positioning in the other two planes. Establish an appropriate angle in the sagittal plane, aligning it horizontally across the liver. The slices must be sufficient to cover the entire liver from the diaphragm down to the C loop of the duodenum. The phase direction should be from right to left to minimize ghosting artifacts from the anterior abdominal wall. Use phase oversampling to prevent wrap-around artifacts. Adding saturation bands on the top and bottom of the axial block will help reduce arterial pulsation and breathing artifacts. Instruct the patient to breathe gently throughout the scan.
For respiratory gated scans utilizing phase scout navigators, it is essential to accurately position the respiratory navigator box within the liver. Ensure that no part of the navigation box extends beyond the liver boundaries. Planning should be conducted using a free breathing localizer, as the diaphragm’s downward movement during inhalation can result in improper slice planning and positioning of the respiratory navigator box.

Parameters
TR 3000-4000 | TE 110 | FLIP 150 | NEX 1 | SLICE 6 MM | MATRIX 320X320 | FOV 400-450 | PHASE A>P | OVERSAMPLE 50% | IPAT Off |
T2 HASTE axial 6mm respiratory gated
Plan the axial slices on the coronal breath hold images and position the block horizontally across the liver as shown. Verify the positioning in the other two planes. Establish an appropriate angle in the sagittal plane, aligning it horizontally across the liver. The phase direction should be from right to left to minimize ghosting artifacts from the anterior abdominal wall. Use phase oversampling to prevent wrap-around artifacts. Adding saturation bands on the top and bottom of the axial block will help reduce arterial pulsation and breathing artifacts. Instruct the patient to breathe gently throughout the scan.
Parameters
TR 3000-4000 | TE 110 | FLIP 150 | NEX 1 | SLICE 6 MM | MATRIX 320X320 | FOV 400-450 | PHASE A>P | OVERSAMPLE 50% | IPAT Off |
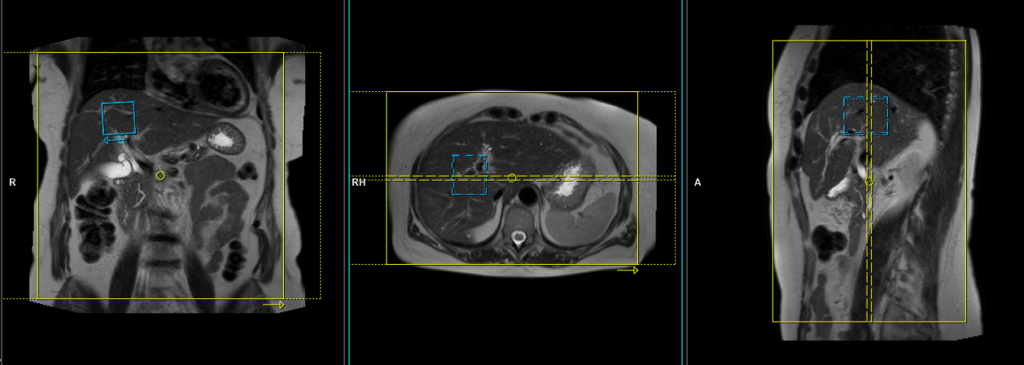
T2 SPACE 3D(or T2 TSE) coronal respiratory gated 1MM
Plan the coronal 3D sequence on the axial HASTE scan. Position the block across the common bile duct and pancreatic duct. Verify the positioning in the other two planes. Establish an appropriate angle in the sagittal plane, aligning it horizontally across the bile duct. Ensure that the slices adequately cover the entire common bile duct, pancreatic duct, and gall bladder. Use phase oversampling to prevent wrap-around artifacts.
In our department, we utilise liver dome navigators for coronal 3D space sequences. It is crucial to accurately position the respiratory navigator box for liver dome respiratory gated scans. Place the box in the middle of the right dome of the diaphragm, ensuring that half of the box is positioned over the right lobe of the liver (segment 8) and the other half over the lungs. Planning should be carried out in a non-breath hold localizer, as the liver is pushed down by the diaphragm during inhalation, which can result in improper slice planning and positioning of the respiratory navigator box.
Instruct the patient to breathe gently throughout the sequence, as very shallow or erratic breathing can diminish the effectiveness of the navigator.
Parameters
TR 2500-3000 | TE 500-700 | FLIP 12 | NEX 1 | SLICE 1MM | MATRIX 320X320 | FOV 350 | PHASE R>L | OVERSAMPLE 50% | IPAT ON |
OPTIONAL SCANS
T2 HASTE axial 6mm respiratory gated using table respiratory sensor
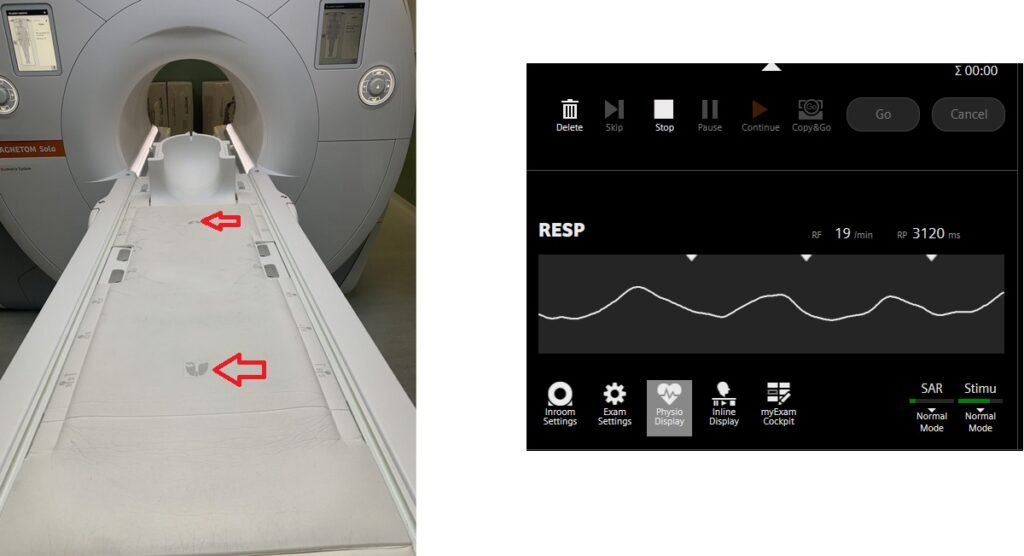
Respiratory gating in modern scanners can now be accomplished using built-in table respiratory sensors. This feature proves particularly beneficial when patients have irregular breathing patterns or are at risk of falling asleep during the scan. The advantage of table sensors is that they do not necessitate any specific planning. The only requirement is to ensure that the patient’s chest is accurately positioned over the table sensors to enable accurate monitoring of breathing. Additionally, it is important to select the appropriate gating option, such as the table sensor gating, in the protocol settings.
Plan the axial slices on the coronal breath hold images and position the block horizontally across the liver as shown. Verify the positioning in the other two planes. Establish an appropriate angle in the sagittal plane, aligning it horizontally across the liver. The phase direction should be from right to left to minimize ghosting artifacts from the anterior abdominal wall. Use phase oversampling to prevent wrap-around artifacts. Please advise the patient to maintain a gentle and steady breathing pattern throughout the entire scan.
Parameters
TR 4000-5000 | TE 500 | FLIP 150 | NEX 1 | SLICE 40MM | MATRIX 320X320 | FOV 300-400 | PHASE R>L | OVERSAMPLE 50% | IPAT ON |
Table sensors
Advanced MRI scanners are equipped with built-in table sensors that detect the respiratory waveform and trigger data acquisition during the expiration phase of the respiratory cycle. Proper patient positioning over the sensor is critical for accurate respiratory gating. This method eliminates the need for external respiratory gating equipment, such as sensors and belts.