MRA Upper Arm : Protocol and Planning
Indications for MRA upper arm
- Arteriovenous malformation
- Brachial artery dissection
- Brachial vein thrombosis
- Brachial Artery stenosis
- Atherosclerotic disease
- Aneurysms
- Vasculitis
Contraindications
- Any electrically, magnetically or mechanically activated implant (e.g. cardiac pacemaker, insulin pump biostimulator, neurostimulator, cochlear implant, and hearing aids)
- Intracranial aneurysm clips (unless made of titanium)
- Pregnancy (risk vs benefit ratio to be assessed)
- Ferromagnetic surgical clips or staples
- Metallic foreign body in the eye
- Metal shrapnel or bullet
Patient preparation
- A satisfactory written consent form must be taken from the patient before entering the scanner room
- Ask the patient to remove all metal objects including keys, coins, wallet, cards with magnetic strips, jewellery, hearing aid and hairpins
- Ask the patient to undress and change into a hospital gown
- Contrast injection risk and benefit must be explained to the patient before the scan.
- Gadolinium should only be given to the patient if GFR is > 30
- An intravenous line must be placed with extension tubing extending out of the magnetic bore
- Intravenous line must be placed in the unaffected side e.g if the problem exists in RT arm the canula should be in LT side
- Claustrophobic patients may be accompanied into the scanner room e.g. by staff member or relative with proper safety screening
- Offer headphones for communicating with the patient and ear protection
- Explain the procedure to the patient and answer questions
- Note the weight of the patient
Positioning for MRA Upper Arm
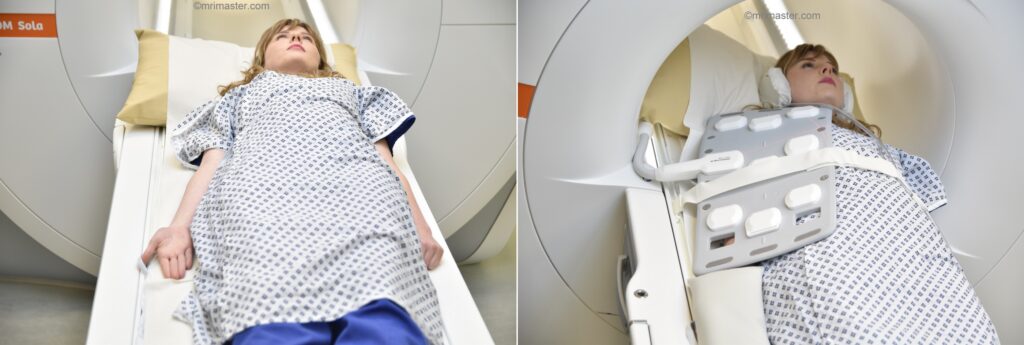
- Position the patient in supine position with head pointing towards the magnet (head first supine)
- Position the patient over the spine coil and place the body coil over the upper arm (shoulder down to elbow)
- Securely tighten the body coil using straps to prevent respiratory artefacts
- Give a pillow under the head and cushions under the legs for extra comfort
- Centre the laser beam localiser over the mid humerus
- Register the patient on the scanner as 'head first supine'
Recommended MRA Upper Arm Protocols and Planning
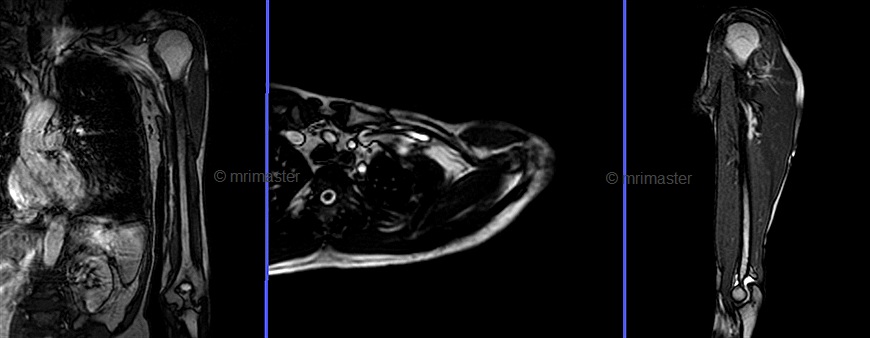
Localiser
A three-plane TrueFISP\HASTE localizer must be taken initially to localize and plan the sequences. These are fast single-shot localizers with an acquisition time under 25s, which are excellent for localizing vascular structures. Take at least 5-8 slices in all planes to get the best results.
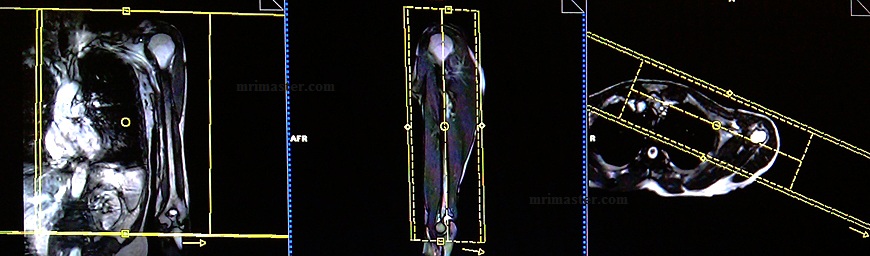
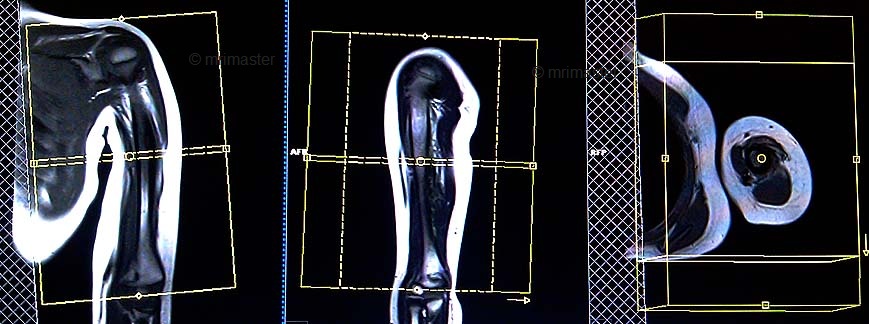
T1 vibe 3d DIXON axial pre contrast 2mm
Plan the axial slices on the coronal plane and angle the positioning block perpendicular to the humerus. Check the positioning block in the other two planes. An appropriate angle must be used in the sagittal plane (perpendicular to the humerus). Slices must be sufficient to cover the whole upper arm, from the acromioclavicular joint to the elbow joint. Adding a saturation band over the chest will help reduce breathing artifacts. The phase direction must be anteroposterior to avoid wrap-around and motion artifacts from the chest.

Parameters
TR 6-7 | TE 2.39 4.77 | FLIP 10 | NXA 1 | SLICE 2 MM | MATRIX 320×288 | FOV 250-300 | PHASE A>P | OVERSAMPLE 20% | BH NO |
T1 flash 3D coronal .9mm -1.1mm pre-contrast
Plan the coronal slices on the axial plane, and angle the positioning block parallel to the clavicle (i.e., parallel to the subclavian artery). Check the positioning block in the other two planes. An appropriate angle must be used in the sagittal plane (parallel to the humerus). Slices must be sufficient to cover the whole upper arm from anterior to posterior. Ensure that the slices adequately cover the entire upper arm from anterior to posterior. Use a sufficiently large field of view (FOV) to encompass the shoulder and elbow joints. To mitigate breathing and arterial pulsation artifacts, consider adding a saturation band over the chest.
For phase direction, either choose right to left or head to feet with 100% oversampling to prevent wrap-around artifacts. It is highly recommended to employ the parallel acquisition technique to reduce scan time (ideally less than 15 seconds) and achieve optimal results.
Parameters
TR 4-5 | TE 2-3 | FLIP 10 | NEX 1 | SLICE 1 MM | MATRIX 320×320 | FOV 350-410 | PHASE R>L | OVERSAMPLE 100% | IPAT ON |
Contrast administration and timing of scans
Guess timing technique:-
This method is considered one of the most straightforward approaches. It relies on estimating the time it takes for the contrast to travel from the injection site to the vascular structures of the abdomen. The effectiveness of this technique heavily depends on factors such as the site of contrast injection, the patient’s age, cardiac output, and vascular anatomy.
Typically, it takes approximately 15-20 seconds for the contrast to travel from the antecubital vein to the arch of the aorta. Consequently, it is recommended to begin the post-contrast T1 acquisition within 17 seconds of administering the contrast.
Care bolus technique:-
Care bolus is the most commonly used bolus detection technique. This technique uses a coronal fast gradient refocused sequence. Real-time images are obtained every second through the vascular structure of interest (usually placed over the heart). The operator can then watch the contrast bolus arriving in the heart and then switch to the centric 3D sequence.
Planning care bolus
Plan the coronal care bolus slice on the sagittal plane. Position the block over the mid-heart and angle the slice parallel to the ascending aorta. Verify the position in the other two planes. Determine the suitable angle in the axial plane, aligning it horizontally across the right and left subclavian arteries. To reduce artifacts caused by breathing and heart motion, utilize a saturation band on both sides of the block.
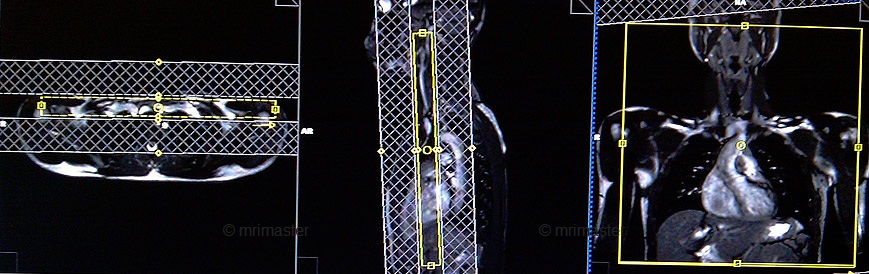
Care bolus scans must start one second prior to the contrast administration. The operator can then watch the scans live and wait for the contrast bolus to arrive in the heart. When the contrast reaches the heart, the care bolus must be stopped immediately and wait for 2-3 seconds before starting the centric 3D dynamic sequence. (This 2-3 second delay is the travel time of the contrast from the heart to the upper arm)

T1 flash dynamic 3D coronal 0.9mm - 1.1mm post-contrast 2 measurements
Plan the coronal slices on the axial plane, and angle the positioning block parallel to the clavicle (i.e., parallel to the subclavian artery). Check the positioning block in the other two planes. An appropriate angle must be used in the sagittal plane (parallel to the humerus). Slices must be sufficient to cover the whole upper arm from anterior to posterior. Ensure that the slices adequately cover the entire upper arm from anterior to posterior. Use a sufficiently large field of view (FOV) to encompass the shoulder and elbow joints. To mitigate breathing and arterial pulsation artifacts, consider adding a saturation band over the chest.. Post contrast scans should be 2 measurements (one for arterial phase and the other for venous phase) with a scan time of less than 15 seconds each.
Parameters
TR 4-5 | TE 2-3 | FLIP 10 | NEX 1 | SLICE 1 MM | MATRIX 320×320 | FOV 350-410 | PHASE R>L | OVERSAMPLE 100% | IPAT ON |
In order for subtraction of the images to be possible, it is crucial that the measurements of pre and post contrast T1 scans are identical. Any differences in slice thickness, FOV, or planning would hinder the ability to perform image subtraction.
T1 vibe 3d DIXON axial post contrast 2mm
Plan the axial slices on the coronal plane and angle the positioning block perpendicular to the humerus. Check the positioning block in the other two planes. An appropriate angle must be used in the sagittal plane (perpendicular to the humerus). Slices must be sufficient to cover the whole upper arm, from the acromioclavicular joint to the elbow joint. Adding a saturation band over the chest will help reduce breathing artifacts. The phase direction must be anteroposterior to avoid wrap-around and motion artifacts from the chest.
Parameters
TR 6-7 | TE 2.39 4.77 | FLIP 10 | NXA 1 | SLICE 2 MM | MATRIX 320×288 | FOV 250-300 | PHASE A>P | OVERSAMPLE 20% | BH NO |