MRI Shoulder Arthrogram : Protocol and Planning
Indications for MRI shoulder arthrogram
- For the evaluation of foreign bodies in the glenoid fossa
- For the evaluation of the integrity of the rotator cuff
- Painful shoulder with normal X-rays and MRI
- For the evaluation of osteochondromatosis
- For the evaluation of glenoid labrum tear
- For the evaluation of adhesive capsulitis
- For the evaluation of shoulder instability
Contraindications
- Any electrically, magnetically or mechanically activated implant (e.g. cardiac pacemaker, insulin pump biostimulator, neurostimulator, cochlear implant, and hearing aids)
- Intracranial aneurysm clips (unless made of titanium)
- Pregnancy (risk vs benefit ratio to be assessed)
- Ferromagnetic surgical clips or staples
- Metallic foreign body in the eye
- Metal shrapnel or bullet
Patient preparation for MRI shoulder arthrogram
- A satisfactory written consent form must be taken from the patient before entering the scanner room
- Ask the patient to remove all metal objects including keys, coins, wallet, cards with magnetic strips, jewellery, hearing aid and hairpins
- If possible provide a chaperone for claustrophobic patients (e.g. relative or staff )
- Contrast injection risk and benefits must be explained to the patient before the scan
- Offer earplugs or headphones, possibly with music for extra comfort
- Explain the procedure to the patient
- Instruct the patient to keep still
- Note the weight of the patient
Arthrography
An arthrogram is an interventional procedure for the assessment of joint capsule pathologies. A radiologist will inject contrast medium into the joint space for the evaluation of joint abnormalities. Injections for mri shoulder arthrograms are normally done under x ray fluoroscopic guidance (some radiologists prefer to use ultrasound guidance)
Positioning for injection: Appropriate positioning of the shoulder is one of the most important parts of an arthrogram. Position the patient in supine with the arm externally rotated (palm of the hand up) to avoid the long head of the biceps tendon. Immobilize the arm using sandbags over the palm.
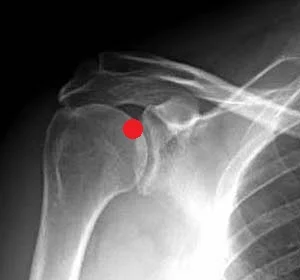
Marking for injection: Mark the skin over the upper medial quadrant of the humeral head, close to the articular joint line.
Injection: – Only a trained radiologist should perform the injection. Radiographers should only assist with the preparation. The following instructions are intended for a trained person who is authorized to perform joint injections.
Start by cleansing the designated site using betadine. Subsequently, administer local anesthesia to the skin and subcutaneous tissues using 1% lidocaine.
Typically, a 22 G 3½” needle is employed for all MR arthrogram injections.
Now position the needle tip directly onto the marked location and verify intra-articular needle placement under fluoroscopic guidance.
Proceed to inject 10 to 15cc of diluted Magnevist.
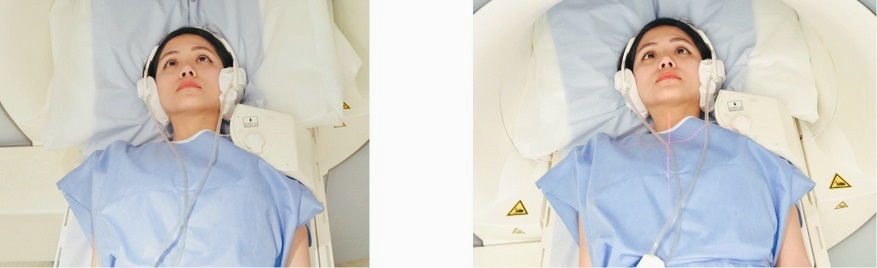
Positioning for MRI shoulder arthrogram
- Position the patient in supine position with head pointing towards the magnet (head first supine)
- Position the shoulder in the Shoulder coil or large flex coil and immobilize with sand bags
- Centre the laser beam localiser over the shoulder joint or the mid line of the coil
- Register the patient on the scanner as 'head first supine'
Recommended MRI Shoulder Arthrogram Protocols and Planning
MRI shoulder arthrogram localiser
A three-plane localizer must be taken at the beginning to localize and plan the sequences. Typically, localizers take less than 25 seconds and utilize T1 weighted low-resolution scans for this purpose. It is advisable to acquire additional localizers based on the initial localizer to obtain accurate coronal, axial, and sagittal views of the shoulder.

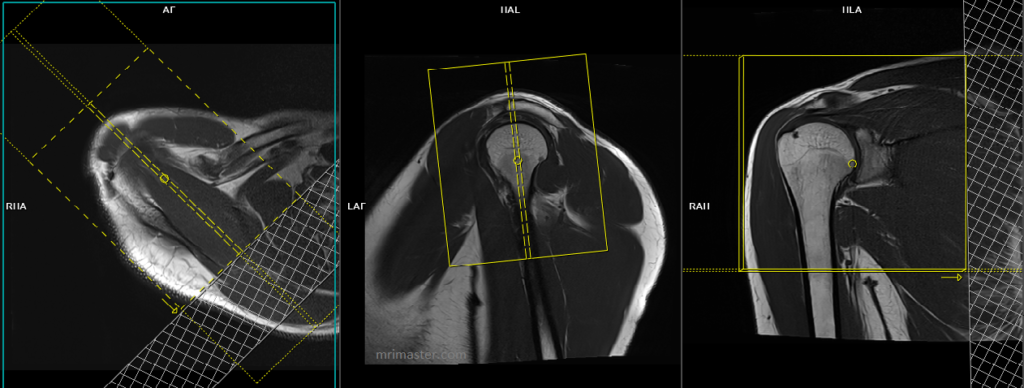
T1 vibe 3d DIXON axial 0.8mm small FOV
Plan the axial 3D block on the coronal plane and angle the positioning block perpendicular to the glenohumeral joint. Check the positioning block in the other two planes. Use an appropriate angle in the sagittal plane, perpendicular to the humeral head. The slices should be sufficient to cover the entire shoulder joint from the top of the acromioclavicular joint to two slices below the inferior glenohumeral ligament (articular capsule). Adding saturation bands over the chest will help reduce ghosting artifacts caused by breathing. The phase direction should be anteroposterior to avoid wrap-around and ghosting artifacts from the chest.

Parameters
TR 6-7 | TE 2.39 4.77 | SLICE .8 MM | FLIP 12 | PHASE A>P | MATRIX 256X224 | FOV 150-180 | GAP 10% | NEX(AVRAGE) 2 |
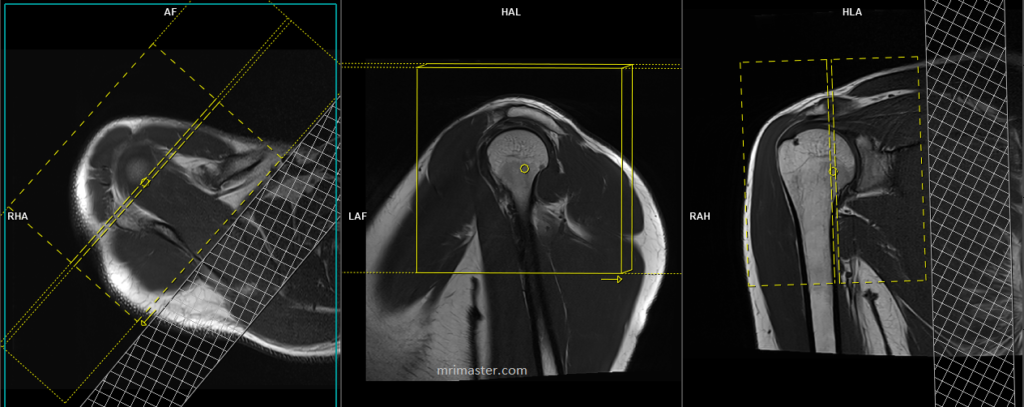
T1 tse fat sat coronal 3mm SFOV
Plan the coronal slices on the axial plane and angle the positioning block parallel to the supraspinatus tendon. Do not exceed a 45° angle, as angling more than 45° will result in a change from the coronal plane to the sagittal plane. Verify the positioning block’s alignment in the other two planes. Use an appropriate angle in the sagittal plane, parallel to the humeral head. Ensure that the slices cover the entire shoulder joint, extending from the anterior portion of the coracoid process to two slices posterior to the humeral head. Additionally, consider adding an oblique saturation band over the chest to minimize ghosting artifacts caused by breathing.
Parameters
TR 600-700 | TE 15-20 | FLIP 150 | NEX 3 | SLICE 3 MM | MATRIX 256X256 | FOV 150 | PHASE A>P | OVERSAMPLE 100% | FAT SAT SPAIR |
T2 stir coronal 3mm SFOV
Plan the coronal slices on the axial plane and angle the positioning block parallel to the supraspinatus tendon. Do not exceed a 45° angle, as angling more than 45° will result in a change from the coronal plane to the sagittal plane. Verify the positioning block’s alignment in the other two planes. Use an appropriate angle in the sagittal plane, parallel to the humeral head. Ensure that the slices cover the entire shoulder joint, extending from the anterior portion of the coracoid process to two slices posterior to the humeral head. Additionally, consider adding an oblique saturation band over the chest to minimize ghosting artifacts caused by breathing.
Parameters
TR 4000-5000 | TE 110 | FLIP 150 | NEX 3 | SLICE 3MM | MATRIX 256X256 | FOV 150 | PHASE H>F | GAP 10% | TI 150 |
T1 tse fat sat sagittal 3mm SFOV
Plan the sagittal slices on the axial plane and angle the positioning block perpendicular to the supraspinatus tendon. Verify the positioning block in the other two planes. Ensure an appropriate angle is set in the coronal plane, parallel to the humerus. Include enough slices to cover the entire shoulder joint, from the deltoid muscle to the scapular notch. Additionally, consider adding an oblique saturation band over the chest to minimize ghosting artifacts caused by breathing.
Parameters
TR 600-700 | TE 15-20 | FLIP 150 | NEX 3 | SLICE 3 MM | MATRIX 256X256 | FOV 150 | PHASE A>P | OVERSAMPLE 100% | FAT SAT SPAIR |